Repair - Modding - Restore

Note: The process on this page has been undone, most of it is obsolete.

My most recent project was adding lighting to the clear shoulder buttons on my PSP. Yesterday, I read the engadget how-to on adding an external analog stick and did that. Below is a picture, but it's not worth writing up since benheck did such a good job with it already.

Once I had completed that one I got pumped about PSP mods and found the shoulder button lighting mod done by llamma. He does a good how-to, and I got a lot if info from there, but I wanted mine to only turn on when you push on the button, so here's how I did it.
GET PARTS

The first step is to steal blue SMD LEDS and their matched resistors from a junk cell phone. Solder the led to a resistor, end to end, and put wires on the ends of that unit. I wanted really really thin varnished wire, so I unwound the coil from a small dc motor for my wire. You can strip the insulation off of the end by sticking it to the soldering iron for a few seconds.

Next, I found some small limit switches. I think these came out of CD-ROM drives. I hacked off as much plastic as I could—mostly the mounting hole. Those and some glue are all the parts needed.
MOD THE PSP
The light was wired up to the proper connections on the PSP boards. I got the connection information from llamma's site. I chose the resistor for the green power led for my ground connection, since this will only switch on when the unit is on. Solder a wire to the resistor, and run it around over the top of the screen to the location of the left shoulder button.

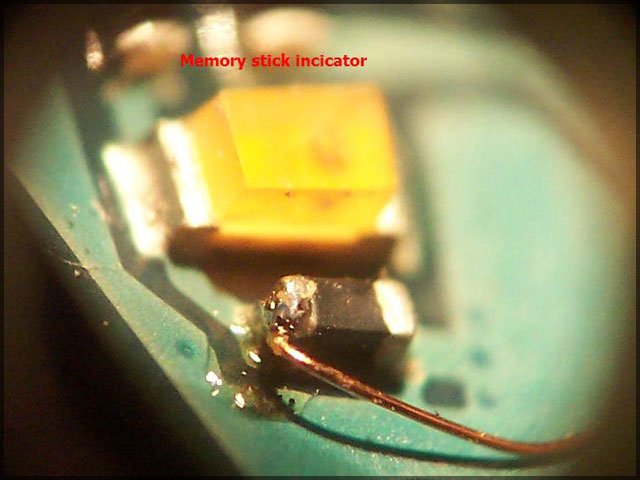
The +5V side comes from the daughter board on the left, just so that I had a shorter distance to run the wire. The anode side of the memory stick indicator LED or that of the wifi indicator LED will provide 5V. I lifted the d-pad piece and ran this wire under it up to the shoulder button.
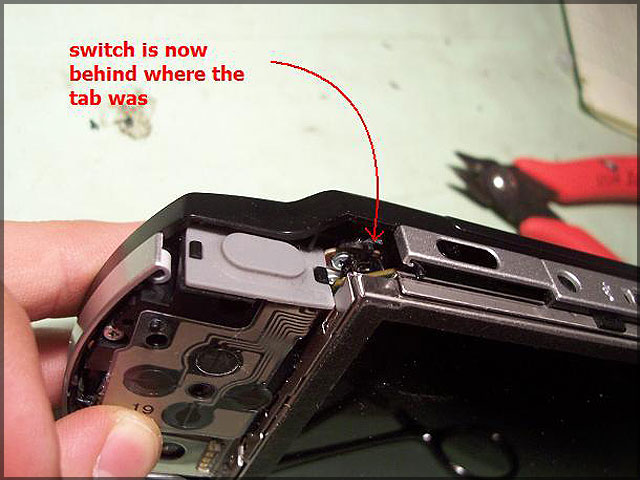
Now comes the most difficult part—finding a place for the switch. I felt it was necessary to use an electrically dissimilar switch to see when the button is depressed because tracing the shoulder button's existing connections would have required further disassembly, and I didn't want to mess with the PSP's existing electronics. I found while doing this mod that the PSP actually has a lot of empty space inside. Most of it is on the right side, but on the left there is a perfect space for the switch I needed to add. If you remove the clear button, you see this tab:

If you look carefully at it, you notice that it actually does nothing structurally, since it doesn't contact anything. If this tab is cut away, there is a nice cavity behind the screen where the switch can fit. Fortunately, the switch can be oriented so that the shoulder button depresses it when pushed. The picture was hard to get, but here is the switch nestled in its spot:
Solder wires to the switch and slide it in there. Get it aligned properly and glue it with hot glue. The proper alignment puts the post vertical and has no stationary parts of the switch extending beyond where the tab would have been. Be sure to insulate the connections to the switch, I had some problems with this. I covered the connections with a thin layer of hot glue.
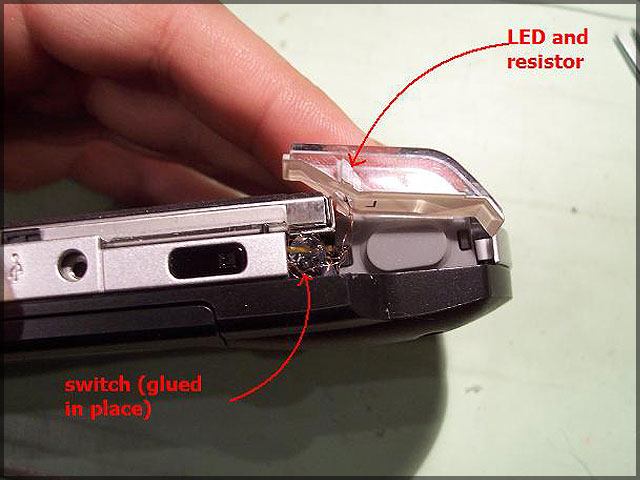
Finally, add the LED and resistor unit to the clear plastic button. I followed llamma's instructions for this (drill a hole, slide them in, glue it). Next, wire it all together. Here I am testing the wiring before gluing. You can see that the ground wire goes off to the right along the top and the 5V wire goes down to the memstick indicator:


Final Notes
Finally, tuck the wires away into the space you have next to the new switch, and reassemble. I was very pleased with the way it looks. The light only comes on when the left shoulder button is pushed, and then only when the PSP is on. So far, only the left side is done. I want to do both sides, but after staring at the right trying to fit the switch for 2 hours, I decided to do just left and leave right for another day. Look back for the finished product sometime soon. If you attempt this, you need a fine-tipped soldering iron and experience with SMD. The parts on the PSP board are so small that you will probably need a good magnifier to do the soldering when you connect wires. Don't try it unless you're confident about soldering to units the size of salt grains.

![]()
News
Advertising with us. Only $5 for 1 month
Place your Ads Here. Contact person gadget.skai@yahoo.com